Why bother with product photos
At a busy booth, reading product names off similar-looking buttons takes longer than recognizing pictures. A grid of 30 visually-distinct thumbnails is faster to scan than 30 buttons of black text, especially when several products share a Name (every "Birth Flower Bookmark" variant, every "Seasonal Door Sign" variant). The Variant label helps but a thumbnail helps more.
Thumbnails are optional. Products without an image fall back to text-only buttons; nothing breaks. Add them when you can, leave blank rows alone for now if you can't.
Two ways to add photos
One per product (manual) or all at once from a Drive folder (bulk). Most vendors use bulk for the initial pass and per-product for one-offs after.
Bulk: Drive folder with SKU-named files
Create a Drive folder for product photos
In Drive, make a new folder. Call it whatever you want ("Product Photos," "fiveanddime Photos," etc.). The folder location doesn't matter; we'll reference it by its URL.
Add photos, named after each product's SKU
Drop your product photos into the folder. The filename (without the extension) must match the product's SKU exactly:
- Product SKU
BKM01→ fileBKM01.jpg(or.png,.jpeg,.webp) - Product SKU
CST-OAK→ fileCST-OAK.png - Product SKU
DSN-SEASONS-SPR→ fileDSN-SEASONS-SPR.jpg
SKUs are case-sensitive on the matching, so use the same casing as your Products_Master sheet. Files for SKUs you don't have yet are ignored; SKUs without a matching file just stay text-only.
Square works best. The button renders the image at roughly 100×100 pixels on a phone and 120×120 on a tablet, so anything north of 200×200 is plenty. Bigger images get downscaled automatically; they don't hurt anything but they make initial loads slower. A pre-cropped 400×400 JPEG at moderate quality is the sweet spot.
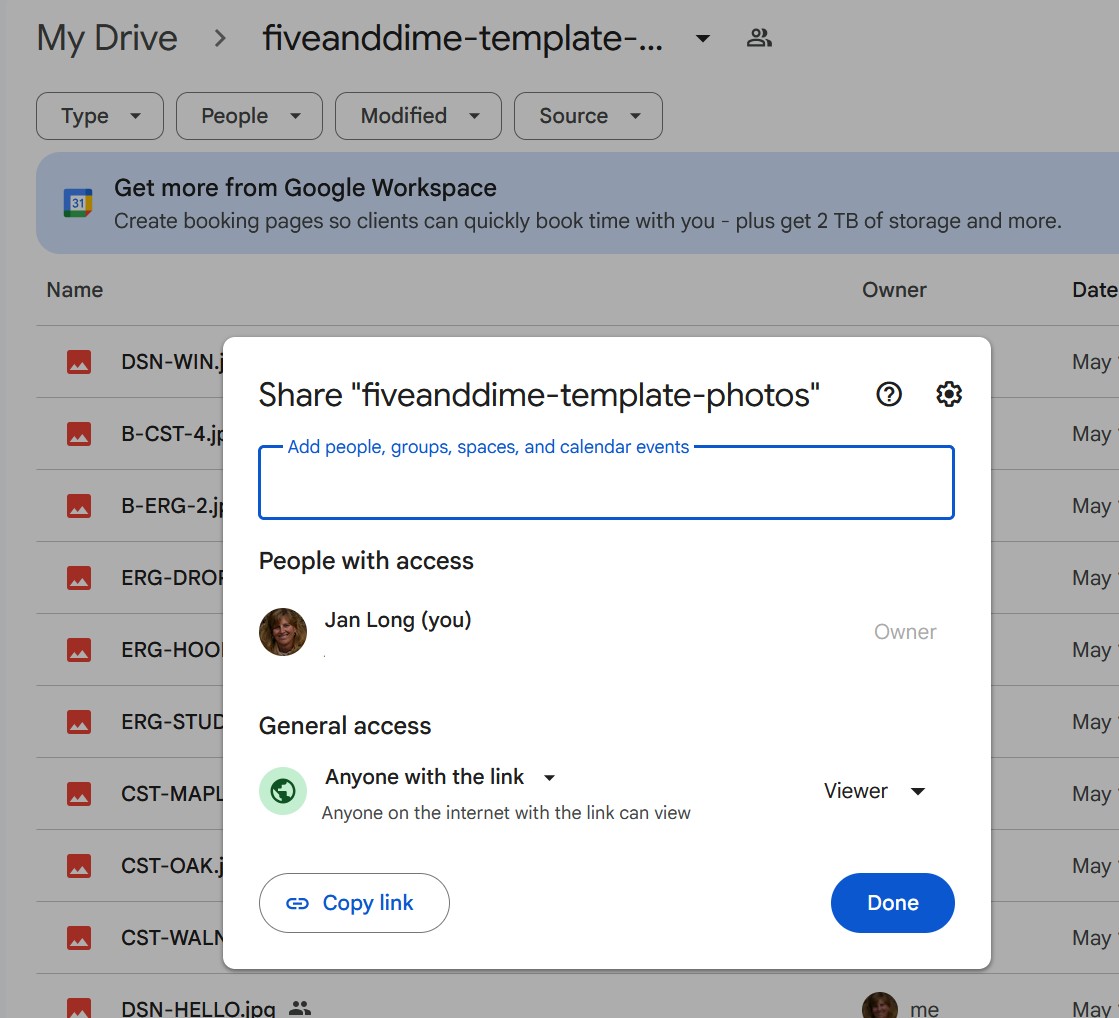
Share the folder "Anyone with the link can view"
Right-click the folder in Drive, pick Share, change "General access" from "Restricted" to Anyone with the link → Viewer. The script needs that permission level to generate thumbnail URLs that any of your devices can load (your phone, your tablet, a helper's device, your desktop). Tap Done.
Note: this makes only the IMAGES_FOLDER's contents publicly viewable by URL. Your spreadsheet, your sales data, the rest of your Drive: none of that is affected. The folder URLs are obscure (long random strings) but they're not secret; treat the folder as containing only product photos you're happy to have public.
If you skip the share step (or leave it on "Restricted"), photos appear on the device where you're logged into Google as the folder owner (usually your laptop) but not on devices that aren't (usually your phone). The symptom is a grey box that flashes on the item button and disappears — the URL loads, the image fetch returns "sign in to view" instead of the image bytes, and the button falls back to text-only. If you ever see that pattern, the folder-share setting is the first thing to check.
Paste the folder URL into Settings → Product photos
4a. Copy the folder URL from Drive. Double-click your photos folder in Drive to open it. The browser's address bar now shows the folder's URL, which looks like https://drive.google.com/drive/folders/XXXXXXXXXXXXX. Click into the address bar, select the whole URL (Ctrl+A on Windows, ⌘+A on Mac), and copy it (Ctrl+C / ⌘+C).
Other ways to get the same URL: from your Drive list (without opening the folder), right-click the folder and pick Share → Copy link, or click the folder once to select it and then click the link icon at the top right.
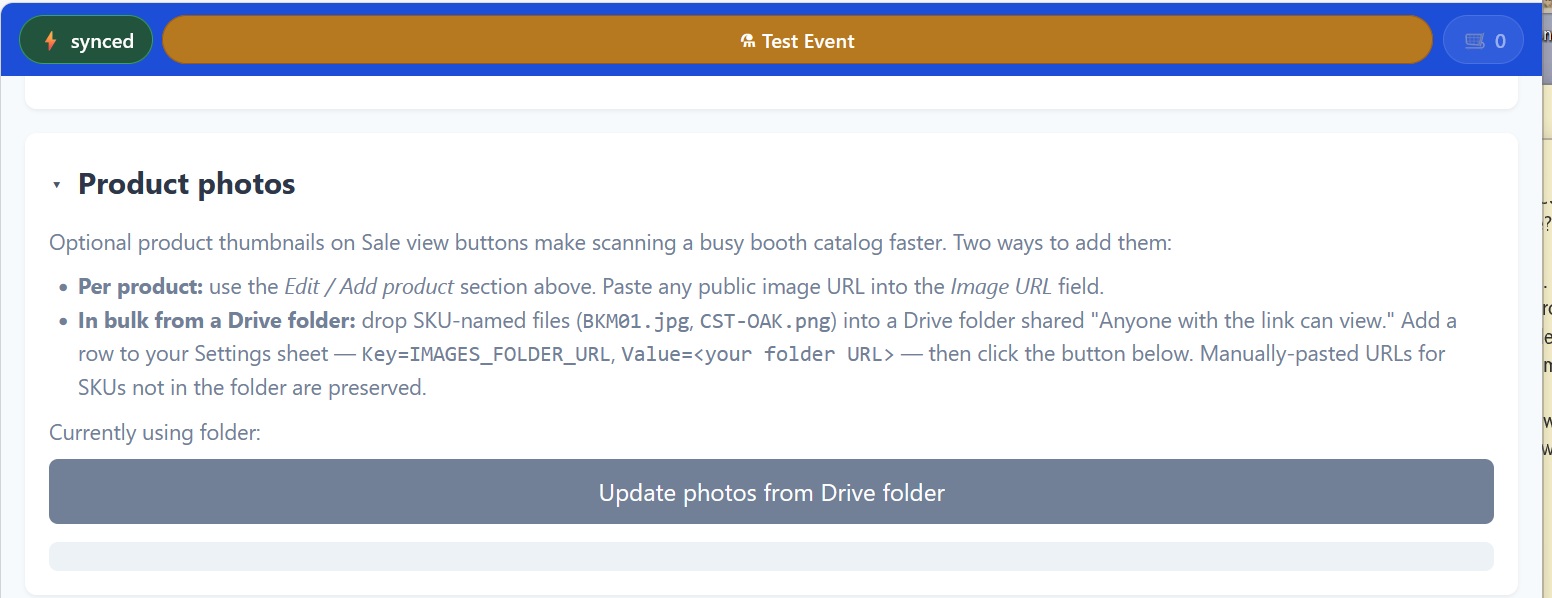
4b. In the app, open Settings → Product photos. Open fiveanddime, tap the Settings tab at the bottom, then expand the Product photos section.
4c. Paste the URL and tap Save. Paste the folder URL into the Drive folder URL field, then tap Save. The line beneath updates to "Currently using folder: …" once it's stored.
Tap "Update photos from Drive folder"
Still in Settings → Product photos, tap Update photos from Drive folder. The script scans your folder, matches each file's basename to a product SKU, and writes the file's public thumbnail URL to Products_Master.ImageUrl. You'll see a status message summarizing how many were linked, how many had no matching SKU, and how many SKUs already had manually-pasted URLs (those are preserved, not overwritten).
Pull from Backend Now again to see thumbnails
One more Pull from Backend Now tap so the device picks up the freshly-written ImageUrl values from Products_Master. Now open the Sale tab. Item buttons show thumbnails.
Optional: set up auto-link so new photos pick themselves up
By default the bulk Update is a manual tap. If you'd rather drop a photo into the Drive folder and have it pick itself up without touching the app, there's an optional auto-link you set up once:
- Open your spreadsheet.
- From the fiveanddime menu at the top, pick Product photos → Set up auto-link from Drive (every 5 min).
- If Google asks for permission, accept. You only do this once per spreadsheet.
From then on, a script in your spreadsheet checks your Drive folder every 5 minutes. When you drop a new SKU-named photo in, the script writes the link to Products_Master.ImageUrl automatically. The next routine backend pull on each device shows the new thumbnail.
The folder-change check is cheap (skips the full scan when nothing's changed), so leaving it on is free. To turn it off later, the same menu has a Stop auto-link from Drive item.
Without auto-link, the manual flow still works: drop the photo, then tap Update photos from Drive folder in the app's Settings → Product photos.
Per-product: paste a single image URL
For one-off photos that aren't in your Drive folder (a marketing image you found online, a hosted asset, a one-of-a-kind product photo):
- In the app, Settings → Edit / Add product.
- Find the product. Open the form.
- Find the Image URL field (under the Advanced expand if needed).
- Paste any public image URL. JPG, PNG, WEBP all work. Save.
The Drive-folder update doesn't touch manually-pasted URLs (a product with a manually-set ImageUrl stays as-is even if the Drive folder doesn't have a matching file).
What appears, what doesn't
- Products with an ImageUrl show a thumbnail above the Name and Variant on the Sale view item button.
- Products without an ImageUrl show as plain text-only buttons (Name on top, Variant below if set, price).
- If an ImageUrl is set but the image fails to load (broken URL, deleted file, network problem), the button silently falls back to text-only. The vendor still sees the product; they just don't see the picture.
- Variant chooser modals and cart line items don't show thumbnails; only the items grid does.
Common questions
Yes. The matcher looks at the part before the extension. BKM01.jpg, BKM01.png, and BKM01.heic all map to SKU BKM01. If you have two files for the same SKU, whichever the matcher finds first wins, so don't keep duplicates.
Rename the photo file to match the new SKU and re-run the update. The old ImageUrl will be replaced. (Better: don't rename SKUs once they're in use. See the catalog tutorial's "renaming SKUs breaks history" callout.)
The Drive thumbnail URL is cached aggressively by Google. If you replace a file in the folder with a new version using the same filename, the URL stays the same and devices may serve the old image from cache for a while. Easiest fix: rename the file to force a new URL, re-run Update photos. Or just wait; cache clears eventually.
Products_Master.ImageUrl populated for SKUs that have matching files. Item buttons in the Sale view show thumbnails.