Why bother with barcodes
At a busy booth, scanning is faster than searching, especially for products with similar names ("Birth Flower Bookmark, January" vs. "Birth Flower Bookmark, February"). And because every label has the SKU printed in human-readable text right beside the barcode, you can always fall back to typing if the camera can't get a clean read. Scanning speeds you up, but it's never required.
- Your
Products_Mastersheet populated with the products you want labeled. The SKU column is what gets encoded, so make sure each product has one. - A printer. Any printer works: laser, inkjet, even a thermal label printer.
- Avery label sheets if you want pre-cut labels: 5160 (30 per sheet, 1" × 2 ⅝", good for medium products) or 5167 (80 per sheet, ½" × 1¾", good for small products like jewelry tags). Available at Office Depot, Staples, Amazon. Or just print the master sheet on plain paper as a single reference card.
Step 1: Generate a label sheet
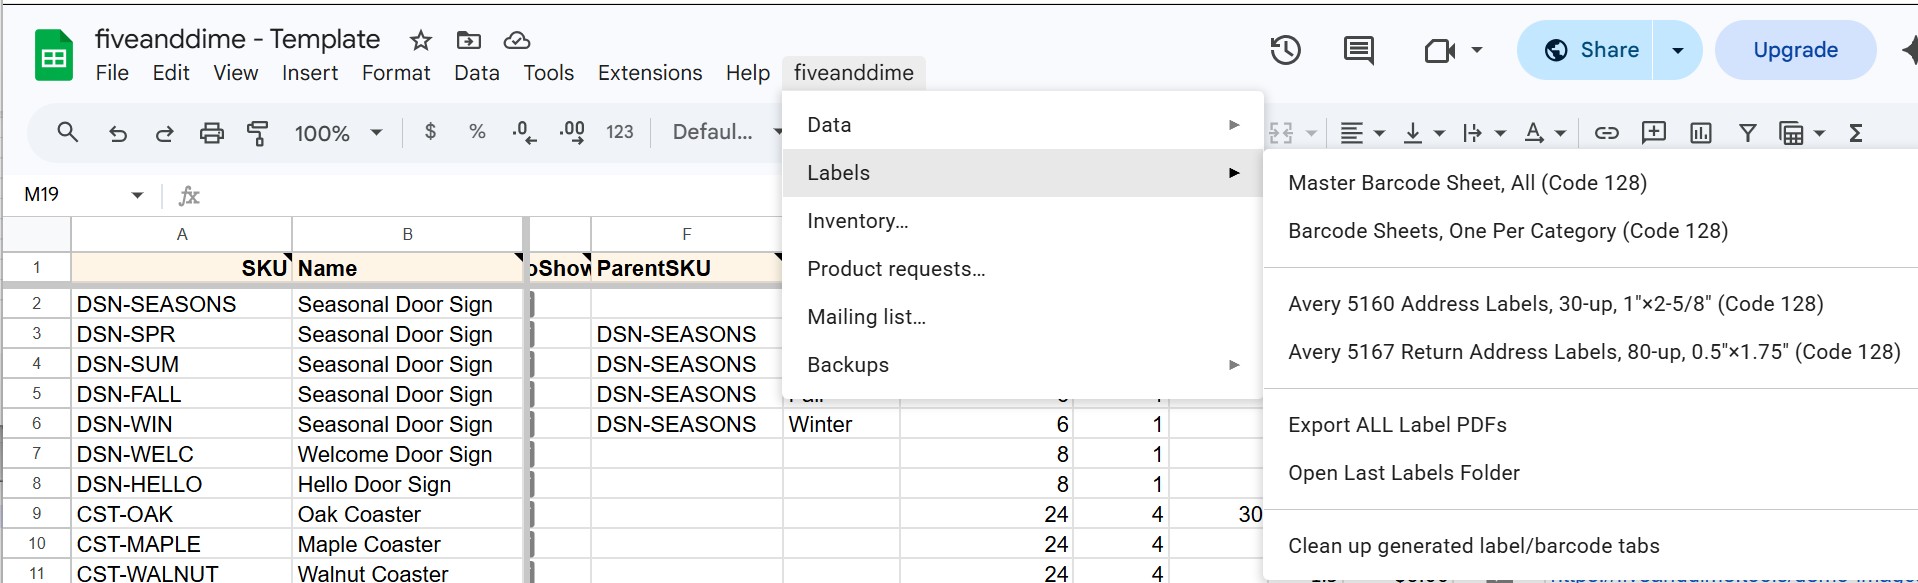
Open the Labels menu in your spreadsheet
Open your fiveanddime spreadsheet in a browser. Look at the menu bar at the top of the sheet. Alongside the standard Google menus (File, Edit, View, ...) you'll see a fiveanddime menu. Click it, then hover over Labels.
Pick the kind of output you want
Two flavors. Pick based on what you want at the booth:
- Reference sheets (one barcode per product, all of them on one or more sheets). Two options: Master Barcode Sheet, All (every active product on one big sheet) and Barcode Sheets, One Per Category (split by category, one sheet each). Print on plain paper, tape inside your booth bin or to your cash box, scan from that page. Doesn't use the Labels scratchpad; one menu click generates it.
- Stick-on labels (multiple labels per SKU, one per item you'll sell). Two layouts: Avery 5160 (30-up, 1" × 2-5/8", for medium products) and Avery 5167 (80-up, 0.5" × 1.75", for small items like jewelry, ornaments, magnets). These use the Labels scratchpad sheet to know how many labels to print per SKU. Need to populate the scratchpad first; see the next substep.
Each format shows SKU + price + name on the label.
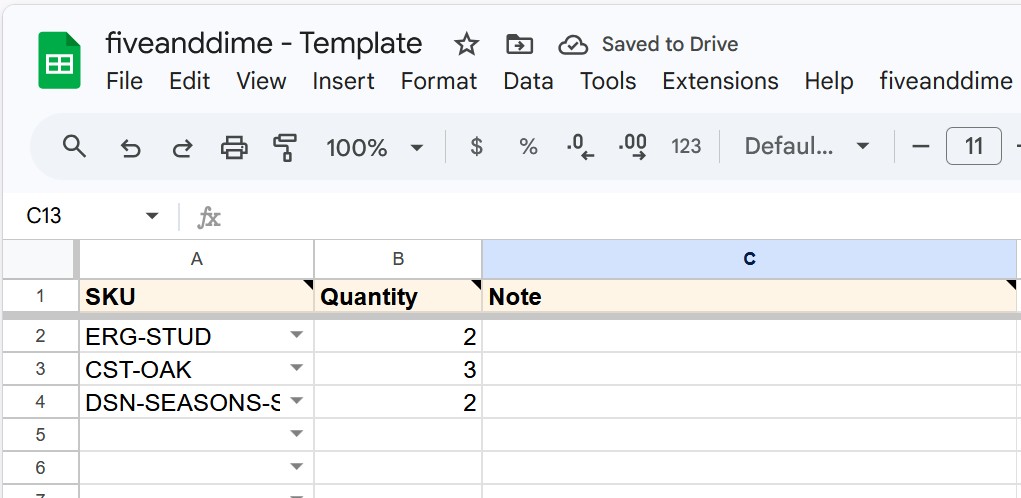
For stick-on labels: populate the Labels scratchpad first
The Avery 5160 / 5167 builders read from a Labels sheet in your spreadsheet. Each row is one SKU and a quantity (how many labels to print for that SKU). Three workflows for getting rows into it, depending on what you're doing:
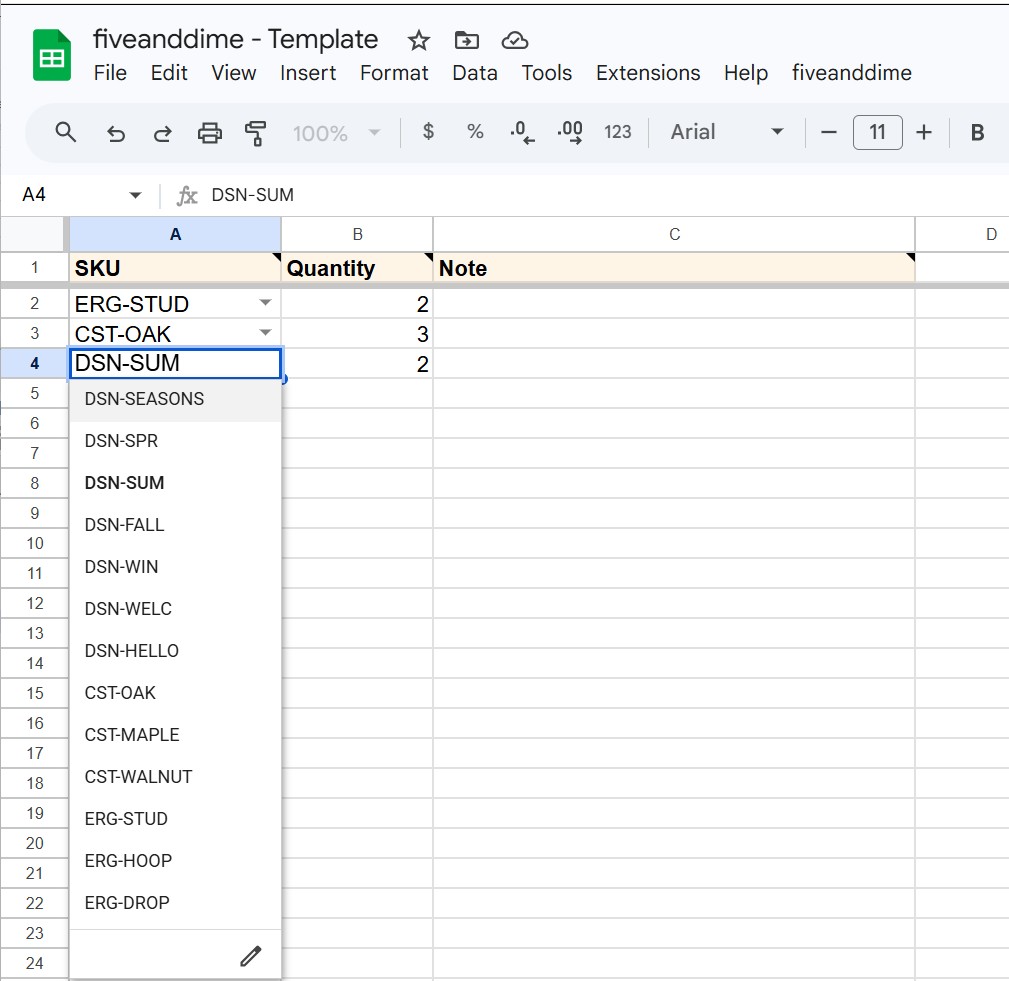
Build it by hand. Open the Labels tab. (If it doesn't exist yet, the fiveanddime menu's Inventory panel has a one-tap setup that creates it with the right structure and SKU dropdown.) Click a cell in column A and pick a SKU from the dropdown; the dropdown only shows real SKUs from Products_Master, so typos are impossible. Type the quantity in column B. Repeat for each product you want labels for. This is the "first-time labeling of a fresh catalog" workflow or the "I want labels just for these specific items" workflow.
Edit an existing scratchpad. The Labels sheet is a regular spreadsheet tab; you edit it like any other Sheets tab. Change a quantity by clicking the cell and retyping. Delete a row you don't need by right-clicking the row number and picking "Delete row." Add more rows at the bottom for products you've decided to label. Useful when you've auto-queued from an event (see the next section) but want to tweak: bring extras of some items, skip others, add a few new pieces. The label builder reads whatever's in the sheet at the moment you tap the menu, so any edits you make are included.
Auto-queue from event sales. Use the restock workflow described in the next section. fiveanddime fills the Labels sheet with exactly what you sold at the event so the next print gives you replacement labels for what you need to remake. Most efficient for ongoing season management.
If the Labels sheet is empty when you tap an Avery menu item, the script alerts you to add rows first. After a successful build, the script prompts to clear the Labels sheet so the next batch starts fresh; choose yes if you've finished printing what's there, or skip the prompt if you want to print again.
Generate the actual sheet
Click the menu item matching the layout you want. The script generates a new tab in your spreadsheet (named something like BarcodeSheet-2026-05-10 or Labels-5160-2026-05-10) with the labels laid out at the right size. Reference sheets pull from your catalog; stick-on labels pull from the Labels scratchpad you just populated.
Test on plain paper first
For stick-on Avery prints especially: print one copy on regular paper before committing a real Avery sheet. Hold the printout against a blank Avery sheet up to the light. The label boxes should line up. If they don't, your printer's scaling is off; turn off "Fit to page" in print settings and try again at 100% scale.
Step 2: Print the labels
When you tap Export ALL Label PDFs for the first time, Google asks for one new permission (it needs to fetch the PDF from itself and save it to your Drive). You'll see the same yellow "App isn't verified" screen you saw on first deploy. Click Advanced → Go to (your script name) (unsafe) → Continue. Same expected flow, one-time only. The full walkthrough is in Setup Step 2 if you need a refresher.
Print directly from the sheet, or export to PDF first
Two paths:
- Print directly from Google Sheets: with the generated tab open, File → Print → set scaling to 100% (not "fit to page") → load the Avery sheet in the printer → print.
- Export to PDF first (recommended for repeat use): fiveanddime menu → Labels → Export ALL Label PDFs. The script saves a PDF of every label tab to a Drive folder named
LabelPages. Open the PDF and print from there. The exported folder stays available for re-printing later, and the menu has an Open Last Labels Folder shortcut to find it again.
Stick the labels on your products
Each label shows the SKU, price, and product name. Stick wherever it'll stay put: bottom of a coaster, back of a frame, under a charm, on the tag string of a knit item. Couple of practical notes:
- Laser print holds up better than inkjet at outdoor markets. Inkjet runs in humidity or rain.
- For very small items, the 5167 format is what you want; the 5160 is too big for jewelry-scale stuff.
- For one-of-a-kind items, you don't need to scan; just type the SKU. Skip labeling these.
Each time you generate a label sheet, the script adds a new tab to your spreadsheet (named something like BarcodeSheet-2026-05-10 or Labels-5160-2026-05-10). They pile up over a season. To clear them out, open the fiveanddime menu → Labels → Clean up generated label/barcode tabs. The script deletes only the generated label tabs; your real sheets (Products_Master, Sales, Events, etc.) are never touched. Same approach for the PDF exports in your Drive's LabelPages folder if you want to tidy those.
Restocking after an event: queue labels for what you sold
The most useful barcode workflow for makers: after each event, print labels for exactly the items you need to remake. fiveanddime can populate the Labels scratchpad sheet automatically based on what was sold at a specific event.
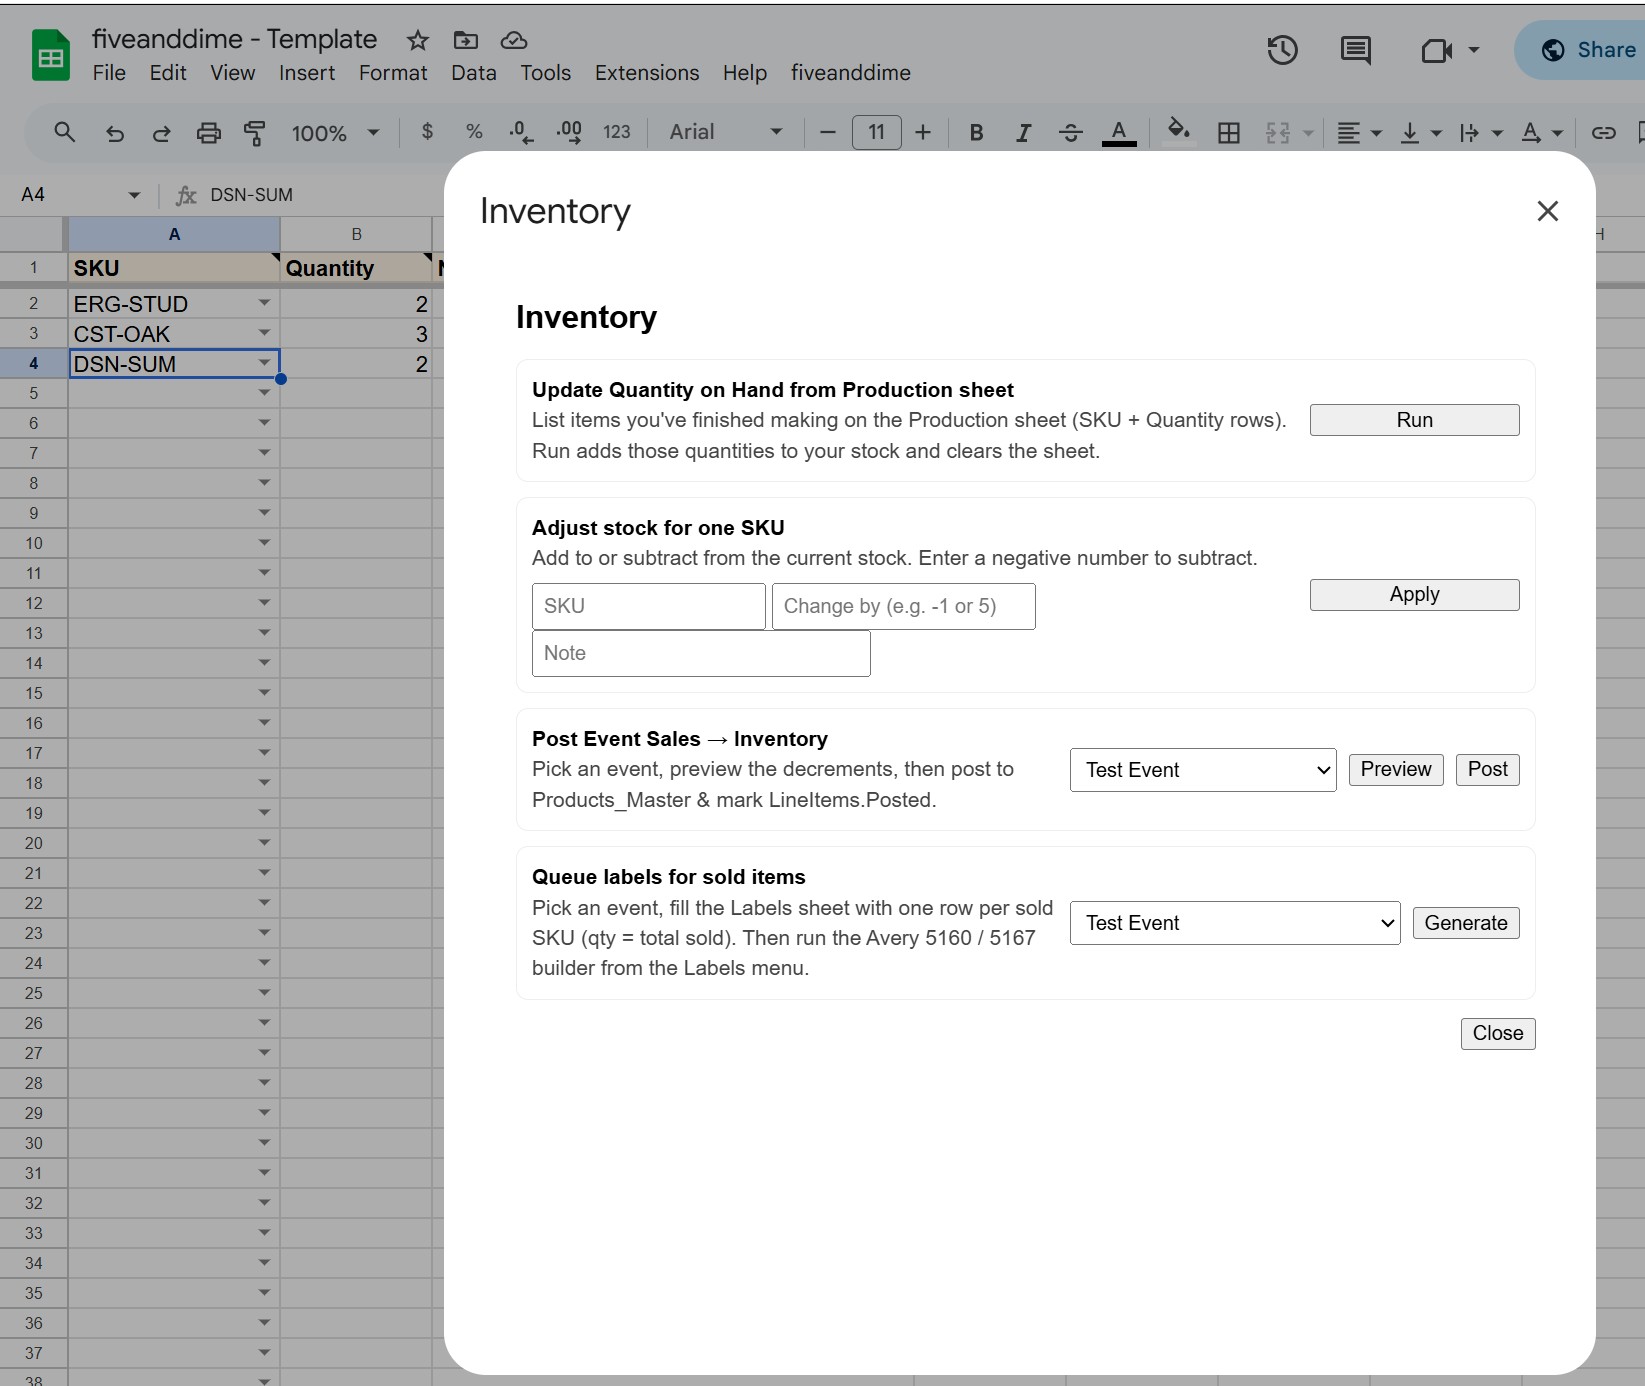
Open the Inventory panel
In your spreadsheet, open the fiveanddime menu → Inventory…. A side panel opens with several inventory-related tools.
Tap "Queue labels for sold items"
Pick the event from the dropdown. The script counts up everything sold at that event (per SKU, excluding voided sales) and writes those quantities to the Labels scratchpad sheet.
If the Labels sheet already has rows from a previous run, you'll be asked whether to Replace them with the new event's quantities, Append on top, or Cancel. Most of the time you want Replace (you've already printed labels for the previous batch).
Generate the Avery sheet from the menu
Now that the Labels scratchpad has the quantities you need, click the fiveanddime menu → Labels → Avery 5160 (or 5167, whichever you use). The script reads the Labels scratchpad and builds the sheet with exactly that many labels per SKU. Print on real Avery stock.
Stick the labels on the items as you remake them
As you finish each replacement piece in your workshop, stick its label on. By the time you've remade everything you sold, the entire stack of labels is used and your new inventory is pre-labeled for the next event.
The natural after-event sequence: post sales to inventory (Events tab → Post sales to inventory) so QuantityOnHand reflects what you have left, then queue labels for the same event so the Labels sheet has exactly what you need to remake. Same event picker, two operations a few seconds apart. Full inventory tracking covered in the Tracking inventory tutorial.
Step 3: Scan at the booth
Open the scanner in the Sale view
In the app, open the Sale tab. Tap the scan button. The camera opens with a viewfinder and a small set of controls.
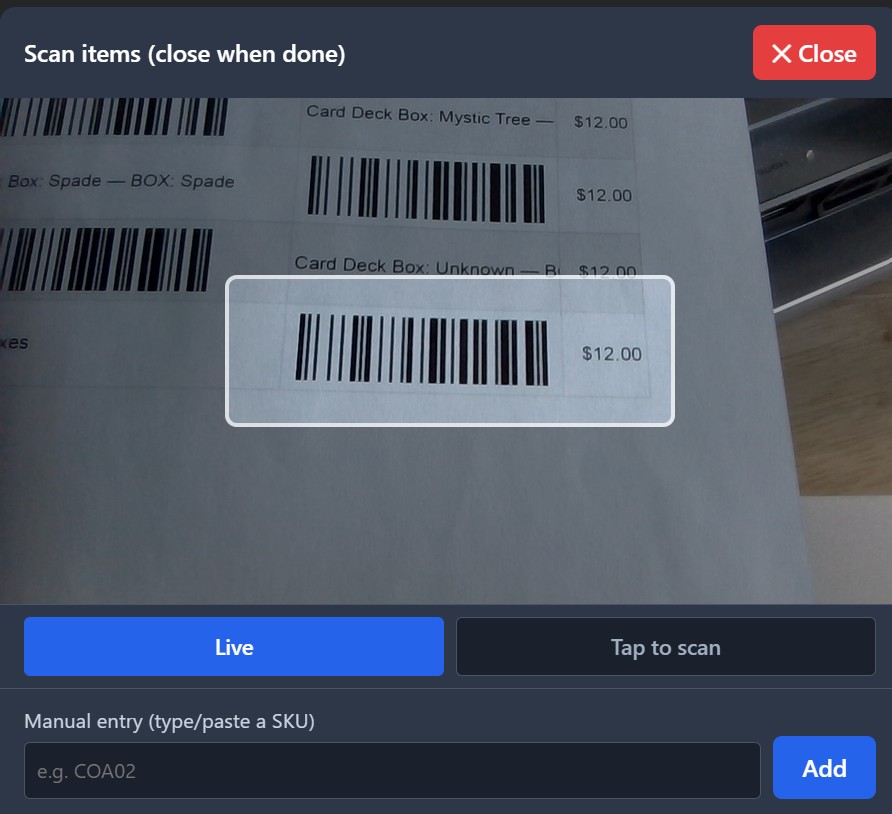
Pick a mode: Live or Tap to scan
The scanner has two modes. Tap the segment buttons in the overlay to toggle (Live / Tap to scan). Your choice persists, so if you mostly use one mode you can leave it permanently.
- Live (default). The camera scans continuously. Point at a barcode and it fires the moment it gets a clean read. Best for individually-labeled products: pick up the item, point at the label, item drops into the cart.
- Tap to scan. Aim the camera, then tap the Scan button (or tap the preview) to capture one barcode at a time. Best when there are multiple barcodes in view and the scanner can't tell which one you mean. The most common case: scanning from a master barcode sheet where dozens of codes are printed close together. Aim at the one you want, tap to capture.
You'll see (and hear, if your sound is on) a quick confirmation when a scan registers. Keep going to add more items. Tap to exit scan mode when you're done; the cart is right there waiting to check out.
Camera barcode scanning works reliably on iPhone (Safari) and Android (Chrome); these are the strongest. Windows Chrome camera support varies depending on browser version and the device's camera. If scanning doesn't work on a particular device, the manual SKU fallback below works on every browser.
Manual fallback when scanning won't cooperate
Sometimes the camera can't get a clean read: bad lighting, a wrinkled label, glare. The label still has you covered:
- Each label prints the SKU in human-readable text right next to the barcode.
- In the Sale view, type the SKU into the search box and tap the matching product to add it. Same result, just a few extra seconds.
This is by design. Scanning speeds you up at a busy booth, but it's never a hard requirement. Every device (phone, tablet, laptop, with camera or without) can run a sale by typing.
Troubleshooting
Your browser is blocking camera access. On iPhone Safari: Settings → Safari → Camera → "Allow." On Android Chrome: tap the lock icon in the address bar → Permissions → Camera → Allow. Then reload the app.
The SKU on the label probably doesn't match anything in your Products_Master sheet. Maybe you printed labels before adding a product, or the product was removed. Check that the SKU exists in the sheet, then pull from backend in Settings to refresh the app's catalog cache.
Tap the × on the line in the cart to remove it, then scan the right one. Easy to recover from.
Tap the qty − button on that line in the cart to drop the count back down. Same as removing one of two.
One-time setup recap
- Buy a stack of Avery 5160 or 5167 sheets (or print on plain paper for a master reference).
- Generate a label sheet from the Labels menu in your spreadsheet.
- Test print on plain paper, confirm alignment.
- Print on the real label stock.
- Stick the labels on products as you make them. Keep a few blank labels handy at the booth for last-minute products.
- At the booth, tap scan in the Sale view, point at the barcode, item drops in the cart.