When to use the importer
- Moving from another POS (Square, Shopify, an old spreadsheet, etc.) and you've exported a CSV of your products.
- Starting with a big catalog that would be slow to type in by hand.
- Adding a batch of new products you've prepared elsewhere (planning a new product line on a spreadsheet, then dropping it in).
For one or two products at a time, the in-app Edit product form is faster. The importer shines when you have a list of 10 or more.
Preparing your CSV
The wizard accepts any CSV with a header row. Common column names get auto-detected (SKU, Name, Price, Category, etc.). If your column names are different ("Item Number" instead of "SKU," for example), no problem; you'll map them in Step 2.
Required columns in the source:
- SKU. Unique product ID. The importer skips rows with blank SKUs.
- Name. Display name. Required for new products.
Everything else is optional. Common columns you'd usually have: Category, Price, Cost, QuantityOnHand. Less common but supported: Variant, ParentSKU, FavRank, BringToShow, Active, ReorderPoint, Custom, ImageUrl.
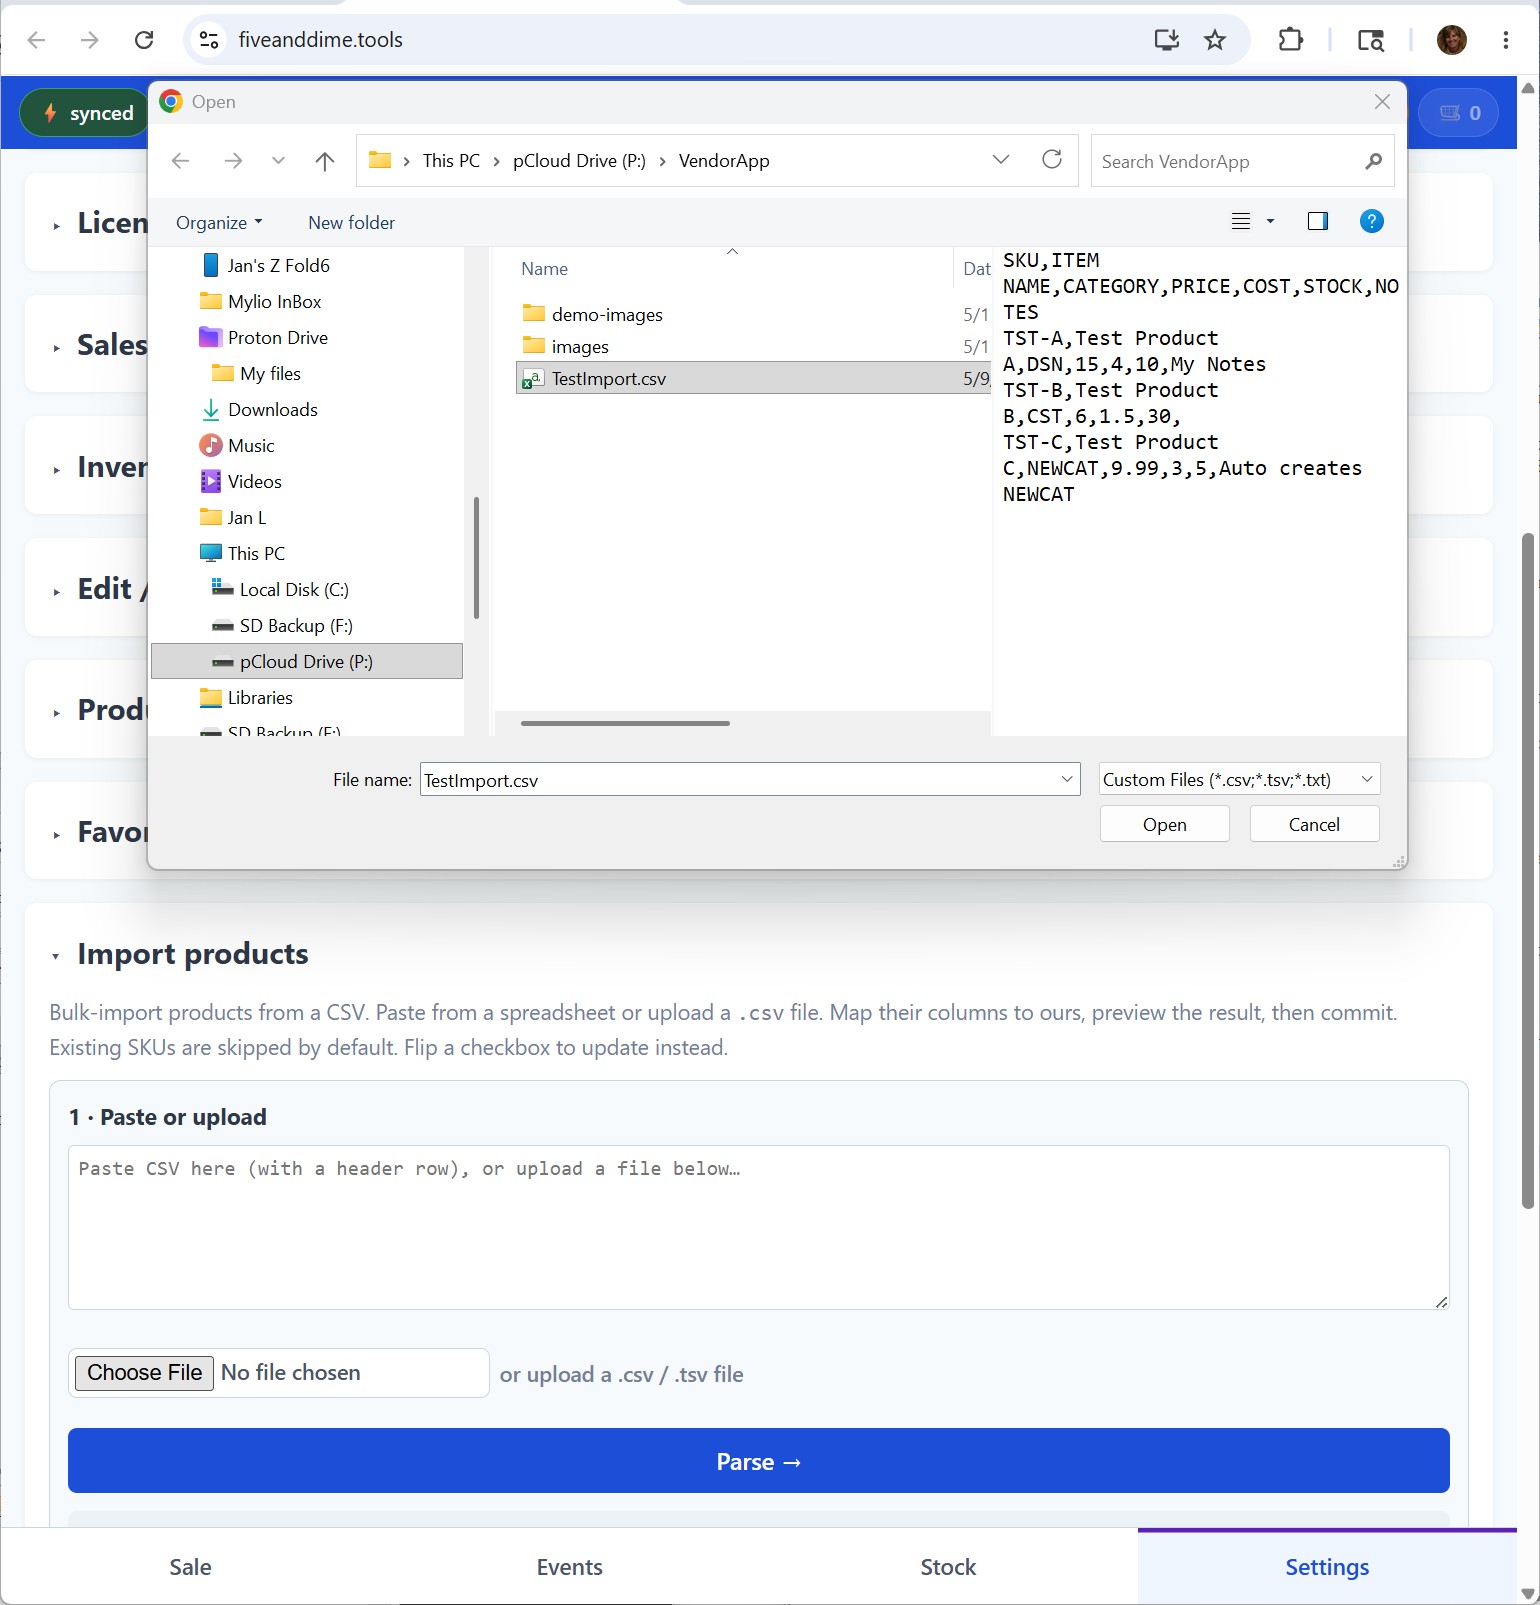
Paste your data into a fresh Google Sheet, make sure the first row is your column headers, then File → Download → Comma Separated Values (.csv). That's your CSV. Or you can skip the file step entirely and just paste from Sheets directly into the importer's text box.
The 3-step wizard
Paste or upload
In the app, go to Settings, expand Import products.
Two ways to get your data in:
- Paste: open your source spreadsheet, select your rows including the header, copy, paste into the textarea.
- Upload: tap the file selector, pick your
.csvor.tsvfile.
Tap Parse →. The wizard reads the header row and the rows below, tells you how many it found, and moves you to Step 2.
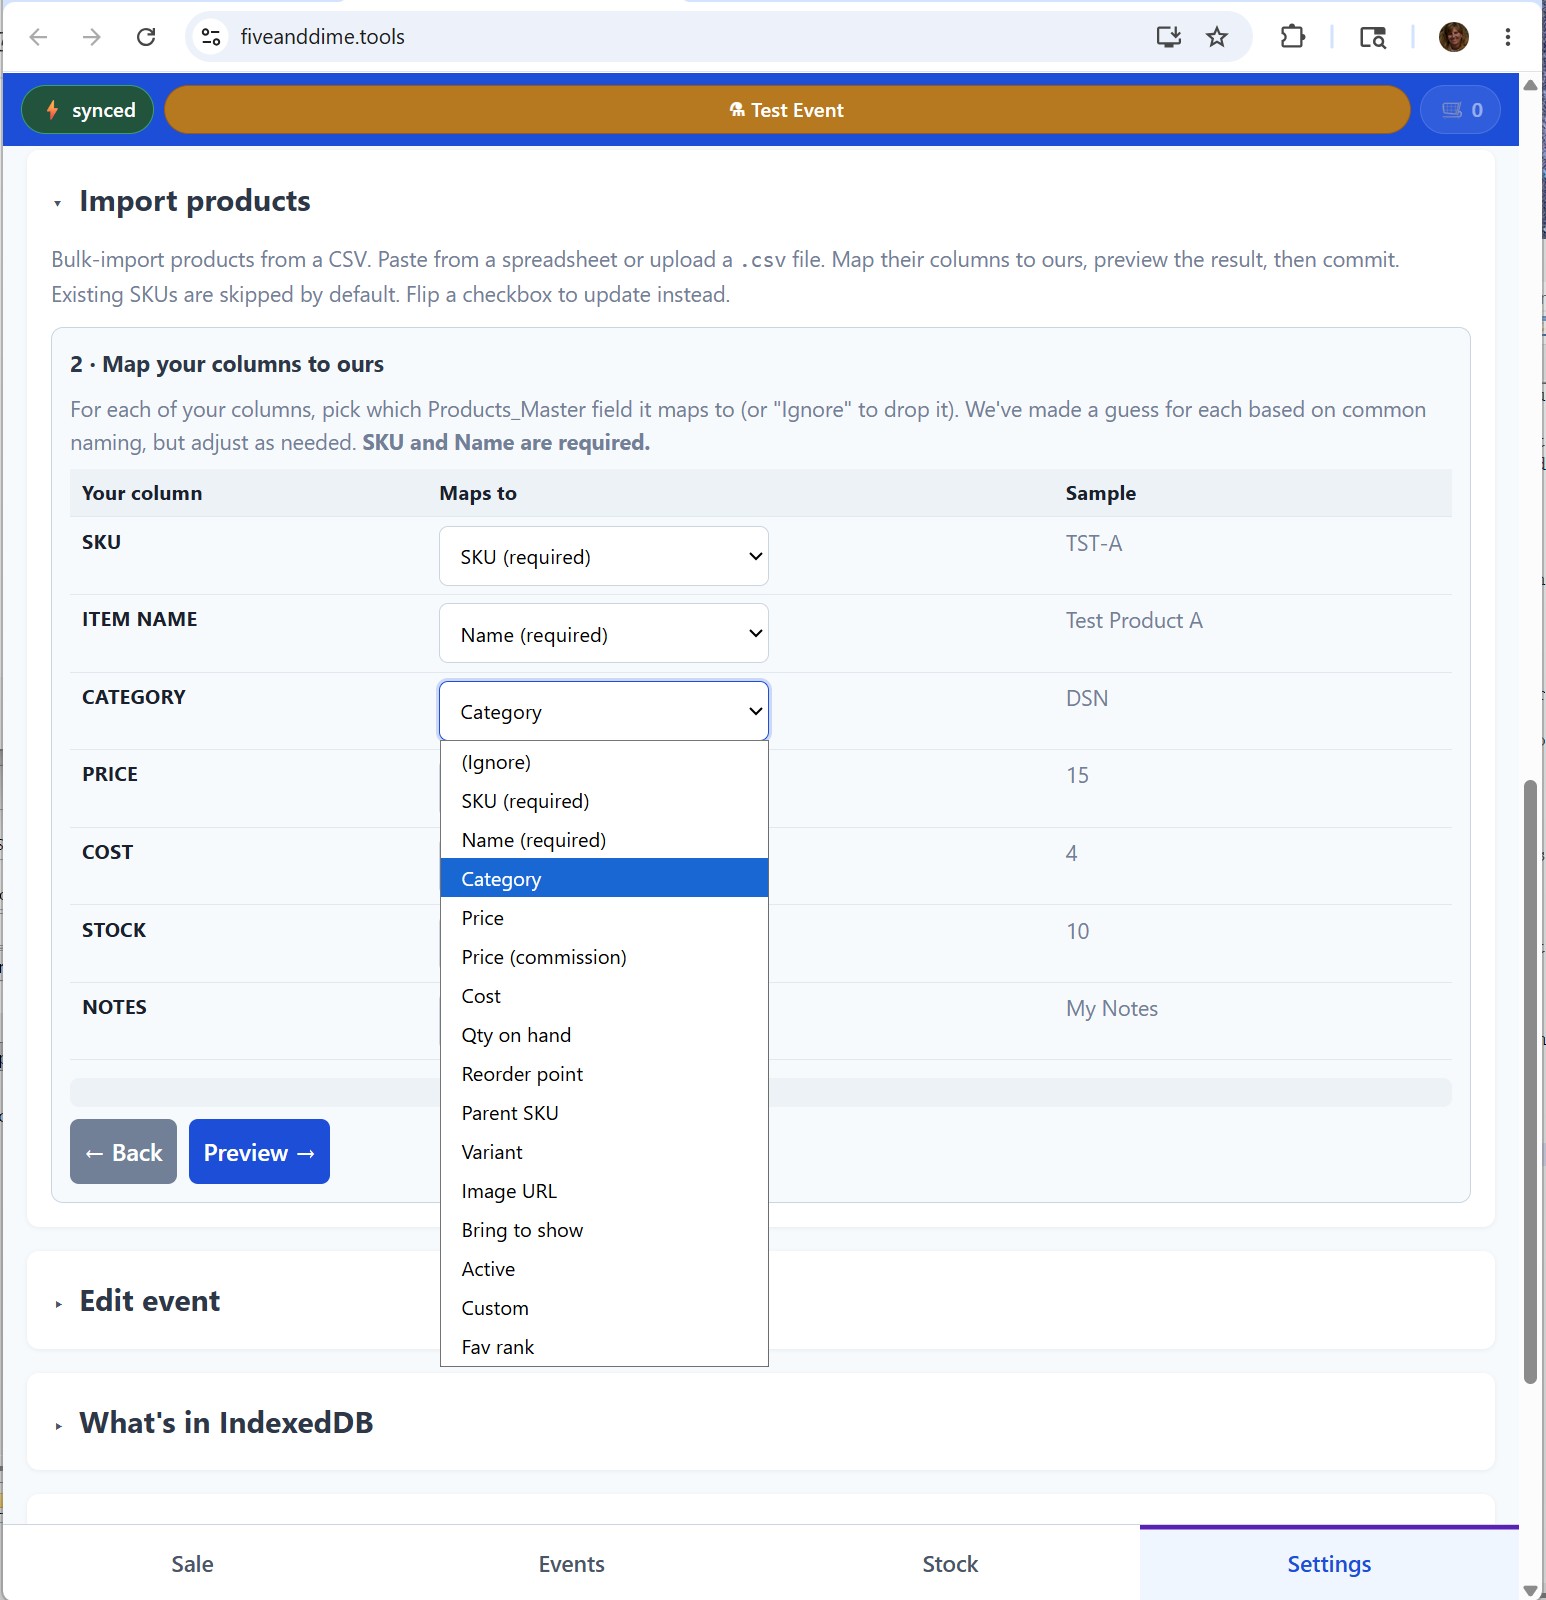
Map your columns to ours
The wizard shows a row for each of your source columns alongside a dropdown of fiveanddime fields. It pre-fills the dropdowns based on header names ("Item Number" auto-maps to SKU, "Stock" to QuantityOnHand, etc.), and shows a sample value from the first row of your data so you can sanity-check.
Adjust as needed. For any column you don't want to import, leave the dropdown set to Ignore. SKU and Name are required; the wizard won't let you proceed until both are mapped.
Tap Preview →.
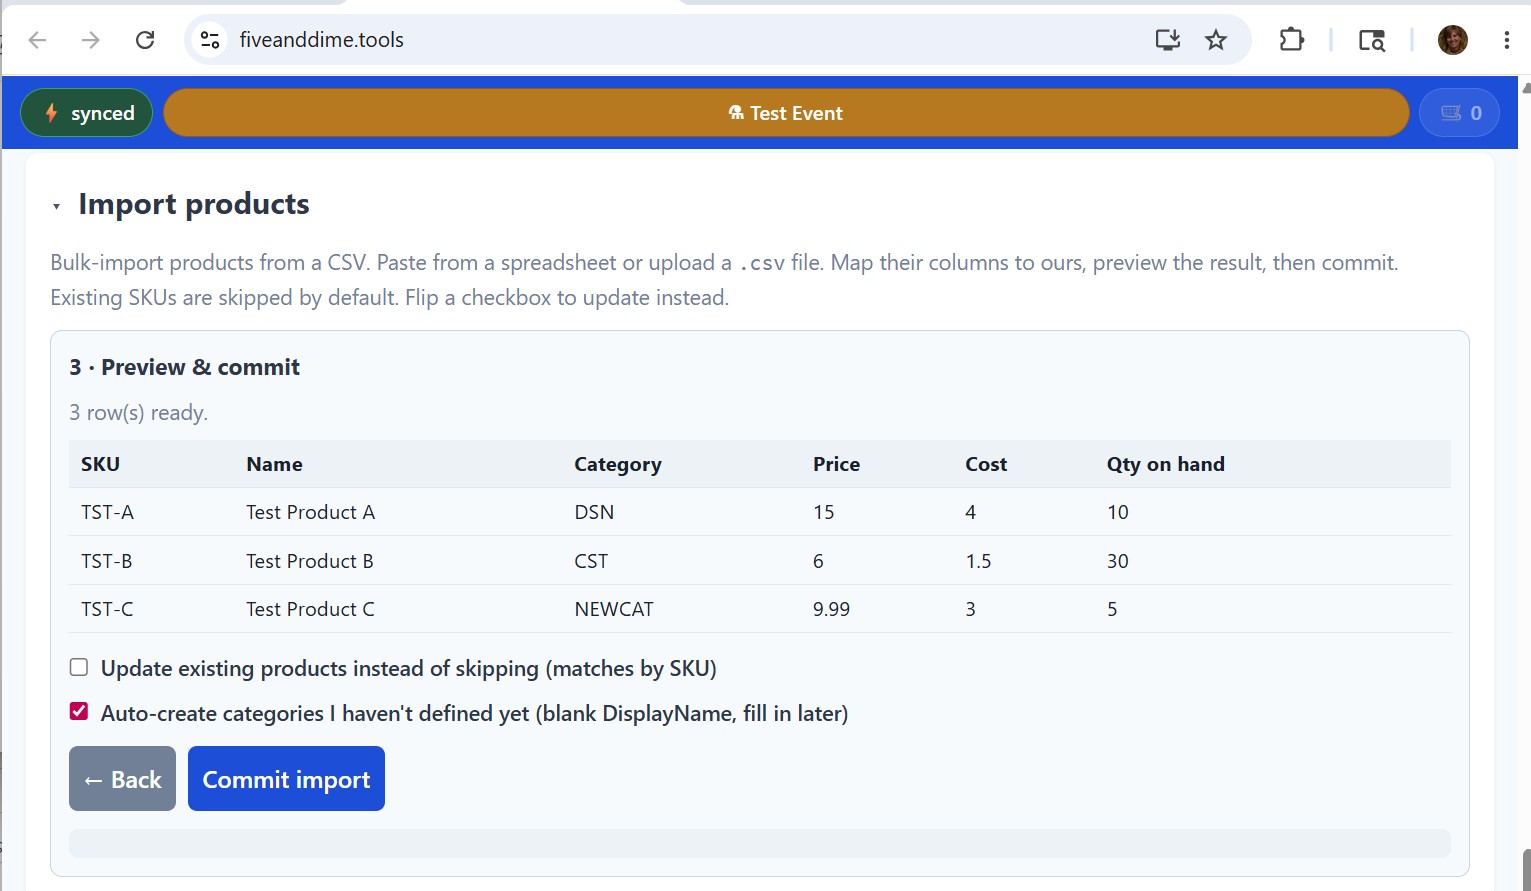
Preview and commit
The wizard renders a table of what will land in Products_Master after the import. Scroll through and verify the columns look right, prices parsed correctly (a stray "$" or comma in a price column will show as a parse error), categories make sense.
Two checkboxes control the commit behavior:
- Update existing products instead of skipping (matches by SKU). Default: unchecked, which means existing SKUs are skipped (your existing products are left alone). Check the box to overwrite existing products with the imported values. Useful when re-importing after edits.
- Auto-create categories I haven't defined yet. Default: checked. If your import references categories that aren't in your Categories sheet yet, they get created with a blank DisplayName for you to fill in later. Uncheck this if you want the wizard to reject products with unknown categories instead.
Tap Commit import. The wizard sends the data to your backend, which writes it to Products_Master. You'll see a confirmation summary: how many added, how many updated, how many skipped, any errors.
Pull from backend to see results
Once the commit confirms, tap Pull from Backend Now in Settings to refresh the app's local copy. Your new products show up in the Sale view items grid under their categories. You can also open your spreadsheet's Products_Master tab to verify the rows landed correctly.
Common gotchas
If your source has prices like "$12.00" or "12,00", the parse may fail on those rows. The simplest fix: in your source spreadsheet, format the price column as plain numbers (12, 12.50) before exporting. Or open the CSV in a text editor and find-and-replace "$" and "," from price fields.
For BringToShow, Active, and Custom, the importer expects literal TRUE or FALSE (also accepts 1/0, yes/no). "Y," "✓," or "checked" won't parse reliably. Fix in your source if needed.
If two rows in your CSV have the same SKU, only the last one wins (the importer writes each row in order). De-duplicate before importing.
The Category column in Products_Master stores the short code (e.g., CST for Coasters), not the display name. If your source has "Coasters" in the Category column, the import will either create a new Category row with Code "Coasters" (which works but is ugly) or fail. Best practice: in your source, replace category text with the codes you've defined in your Categories sheet before importing.
Tips
- Test with a small batch first. Import 5 rows, verify they look right in the app, then import the rest. Catches mapping errors before they hit 500 rows.
- Variants and parents come along. If your source includes a ParentSKU column, parent-and-variant relationships import correctly. Make sure parent rows are in the CSV too (or already exist in your catalog).
- You can re-import. Bumped a price on a few products? Update the CSV, run the importer with "Update existing" checked. The wizard re-maps the same SKUs.
- Manual cleanup is fine. After import, you can still edit individual rows in Products_Master (or via Settings → Edit product) for anything that needs polish.
Products_Master has the rows; categories you didn't already have are created (with blank DisplayNames to fill in).